Solar on a Heritage Home? Yes, You Can.
Learn from the experience of Electrify Boroondara volunteer, Russell Williams, who shares his six tips to make it happen with no (major) headaches:

Living in a 1930s clinker brick home with a terracotta tiled roof in Glen Iris means being part of a heritage overlay — something we value as a way to preserve the area’s character. Our home is considered contributory (rather than significant or non-contributory — see heritage grading). Unlike our significant neighbours, the restrictions have never felt particularly burdensome. When we renovated - before the overlay was introduced - we made sure to respect the style of the street. A few houses nearby are classified as non-contributory, with renovations or rebuilds that are less faithful to the original design but still contribute to the charm of the area in their own way.
We had an old, small north-facing solar system - not highly visible but set back from the street - which needed replacing. We wanted a larger system with panels on the north, west, and south sides, plus a battery. Knowing we were under a heritage overlay, I checked whether permission was needed - and just as well, because it turns out a planning permit is required.
Fortunately, the Council provides good online resources, that answer the primary questions that come to mind:
The main ordinance is also clear: Heritage Overlay - Clause 43.01, which states that in a heritage overlay, a permit is needed if:
A solar energy system is visible from a street (other than a lane) or public park, and the overlay schedule specifies controls for solar.
An EV charging station is visible from a street or public park.
A quick call to the Council’s planning team confirmed that my existing panels and EV charger were fine because they were installed before the overlay. But a larger solar system or any upgrade beyond ‘like for like’ would need a permit.
Those who know me won’t be surprised I was a little indignant. “It’s my roof, I’m trying to do the right thing - help Boroondara meet emissions targets, lower my costs - and bureaucracy gets in the way!” But after calming down, I reflected. The rules are there for a reason. Without the permit process, how could inappropriate installations be prevented? How would I feel if a neighbour installed something that stood out and disrupted the streetscape?
So I accepted the process, grumbling a little that it would cost me time and money. I wished I could just speak with a planner, explain that I’m a reasonable person trying to do the right thing, and get their approval by email. But rules are rules.
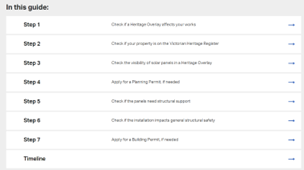
In the end, the process wasn’t too bad - there’s definitely room for improvement - but the Council’s solar guide explains it clearly in six steps.
Six tips from my experience:
Choose an installer familiar with your roof type. Some won’t work on terracotta or slate tiles. Have spare tiles on hand, and it’s worth having a roofer on call in case repairs are needed.
Work with your installer on panel placement. Aim to minimise visibility from the street while maximising solar gain. North and west-facing roofs are usually best, avoiding shade where possible - your installer should advise on this anyway.
Prepare a simple proposal. You’ll need to explain what you’re doing, why, and how - including system size, number of panels, and orientation. I submitted a satellite image showing the panel positions and street photos marked up to show how visible they’d be. Although the guidelines mention a 1:100 or 1:200 scale plan, the Council was happy with my satellite and photo approach. I also noted my installer was Solar Victoria-approved, using Clean Energy Council-certified components.
Check if a building permit is needed. For flush-mounted panels, no. For angled frames, possibly. State this in your submission.
Get the right documents. You’ll need a current Certificate of Title and perhaps a covenant certificate. These are easily purchased via Landata (linked in the Council guide). Tip: it’s slightly cheaper to search by volume/folio number (found on your property purchase documents) rather than your address — don’t ask me why.
The VicSmart application is straightforward. It cost me $220 (for projects under $10k - I included the battery in my total, but since the solar component was only $8k, I selected the under $10k option). The process says it takes up to 10 days, but I had a planner assigned the next day and heard back shortly after. Unfortunately, my first submission was rejected - the panels were considered too close to the front of the house. I worked with my installer to adjust the layout, updated the satellite image, and resubmitted.
In total, from submission to approval (with a revision), it took 8 working days. Had I not needed to revise it, I suspect it would have been done in 3–4 days.
In summary:
If you’re in a heritage area and your panels are visible from the street, you need a permit. Yes, it adds a few hundred dollars and a bit of paperwork, but it serves a purpose - preserving neighbourhood character while still enabling electrification. The process could be streamlined, and ideally, solar shouldn’t face the same hurdles as major renovations. Maybe that’s a discussion for the future.
Since I went through this, the Council has published updated guidance: Guide to solar panels in a heritage overlay | City of Boroondara.